Request an upgrade to MaxBlend2 +p in exchange for your current setup. Just follow these simple steps
What You Will Need
- MaxBlend 2+p Upgrade Kit:
- MaxBlend 2+p monitor assembly(ies)
- MaxBlend 2+p IFU
- Serial Number Upgrade Form
- Return shipping label
- Packing materials from kit for return shipment
- A soft work surface
- 5/32” Allen Wrench
- Packing tape
NOTE: The original products and Serial Number Upgrade form must be returned within 30 days of receipt of your Upgrade Kit to avoid any fees.
1. Select the Correct Monitor Assembly
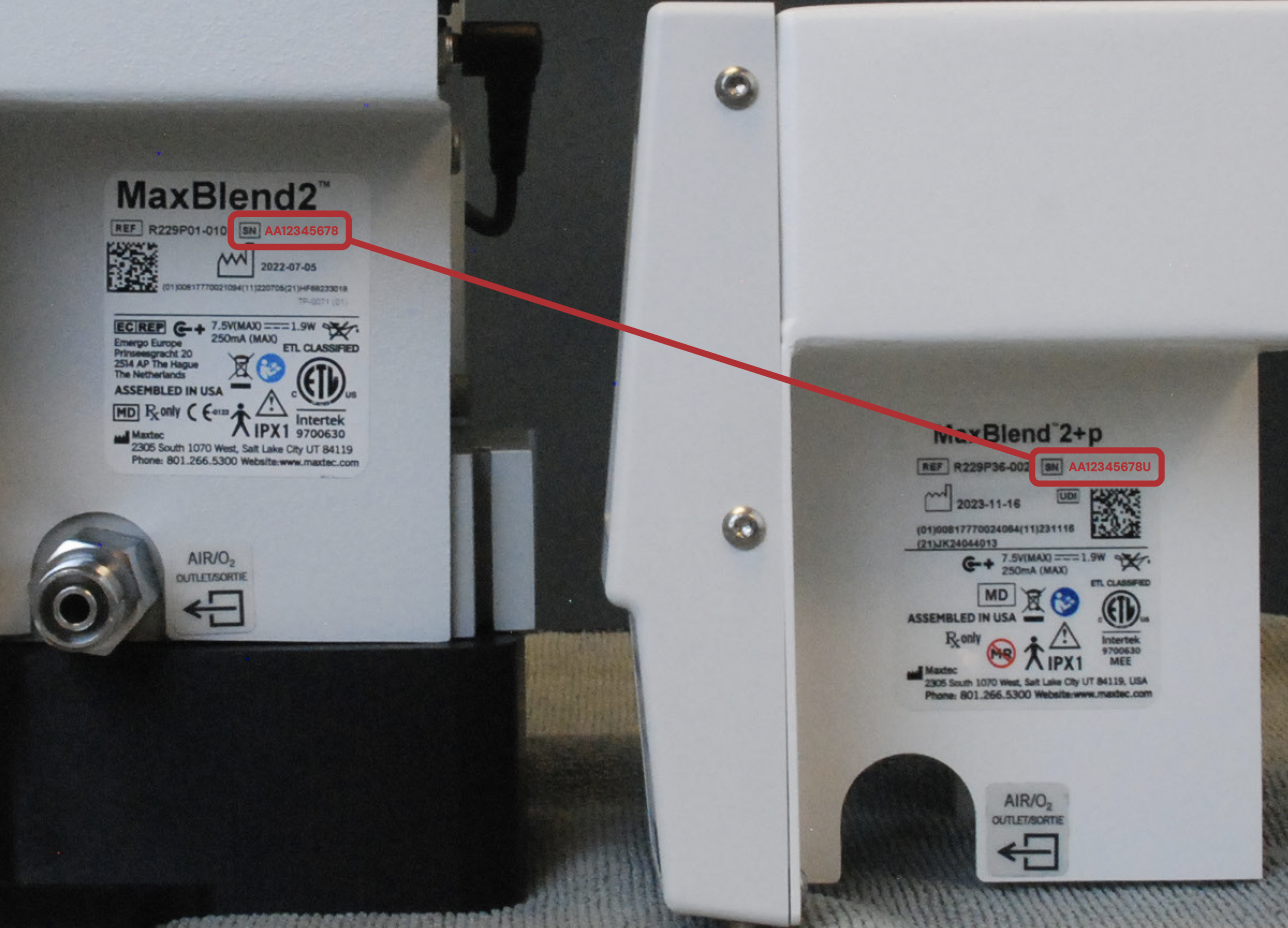
- Locate the MaxBlend 2+p Upgrade Kit with the corresponding serial number to the unit being upgraded
- Remove the MaxBlend 2+p monitor assembly from the shipping box to verify that the serial number matches
NOTE: The serial number of the replacement unit will have an additional letter ‘U’ at the end)

2. Prepare the Device for Upgrade
CAUTION: Do not perform any portion of this upgrade process while using the device on a patient
- Disconnect all gas sources from the MaxBlend 2 device
- Disconnect the sensor cable from the back of the device
- Remove the battery tray from the back of the device


3. Remove the Monitor Assembly
- Place the MaxBlend 2 face down on a soft work surface to prevent any damage to the face of the device
- Using a 5/32” Allen wrench, remove the two bolts on the back
- Remove the MaxBlend 2 monitor assembly from the device by sliding the two apart from each other
CAUTION: Do not dissassemble the blender any further


4. Upgrade to the MaxBlend 2+p Monitor Assembly
- Slide the MaxBlend 2+p monitor assembly onto the original device
- With a 5/32” Allen wrench, replace the two bolts on the back of the device


5. Prepare Device(s) for Return
- Confirm that the serial number of the original MaxBlend 2 monitor assembly (removed in Step 3) corresponds to the one on the shipping box (the serial number on the shipping box will have an additional ‘U’ at the end)
- Check the box on the Serial Number Upgrade Form indicating that the serial numbers match
- Place the original MaxBlend 2 monitor assembly into the shipping box and secure it with packing tape
NOTE: The original products and Serial Number Upgrade form must be returned within 30 days of receipt of your Upgrade Kit to avoid any fees.

6. Prepare the Upgraded Device for Service
▪ Reconnect the sensor cable
▪ Place fresh batteries in the battery tray and install in the back of the monitor assembly


7. Performance Check
- Power on the device
- Complete a Blender Safety Check as described in Section 3.1 of the IFU
Complete Additional Upgrades
- Repeat steps 1-7 for any additional upgrade units
NOTE: Please ensure that all serial numbers are correctly matched as each unit it upgraded
8. Return MaxBlend 2 Monitor Assemblies to Maxtec
- Complete the Serial Number Upgrade Form by initialing and signing in the appropriate fields, certifying that the upgrade was performed in accordance with this process
- Place all original MaxBlend 2 monitor assemblies in the upgrade kit packaging
- In the return shipment box, include the completed Serial Number Upgrade Form verifying each unit
- Apply the return shipping label and ship all the original monitor assemblies to Maxtec
NOTE: The original products and Serial Number Upgrade form must be returned within 30 days of receipt of your Upgrade Kit to avoid any fees.
Questions call 1-800-748-5355, or email [email protected]
MaxBlend 2+p Instructions for Use